Bindings!
Bindings are awesome. There are so many different types and shapes with so many little components you can play with… so much fun.
They’re a pair of important piece of equipment in snowboarding because they let you control the board.
Before you learn about bindings, there are some terms you need to know.
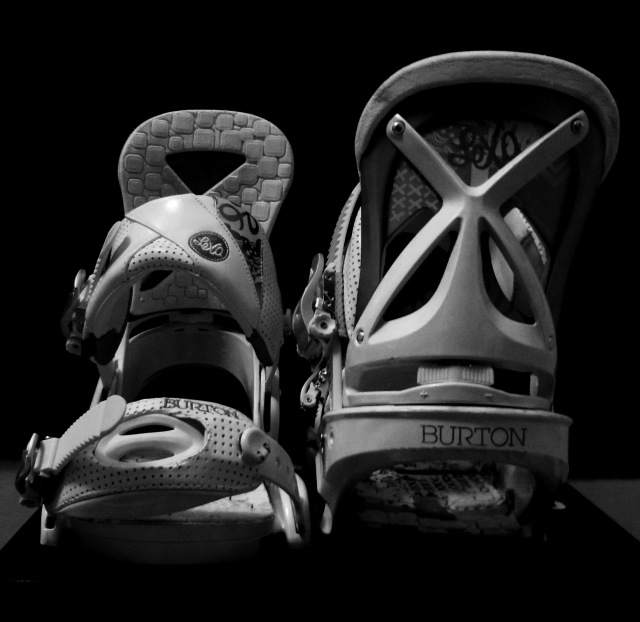
Baseplate– the main component of the binding body frame. Includes the disc (3 hole or 4 hole) or two slots on both sides in the case of Burton EST system. Some will have fixed or detachable padding for shock absorption.
Highback– the spine of the binding that supports your boots and transports movement to the board during actions such as heelside turns. Most bindings allow rotational adjustment (sideways) for more accurate movement transportation to the board. Forward lean adjustment is for altering the level of response of the bindings.
Ankle strap– secures your boots to the bindings in the ankle area for maximum response and board control. Thick toe straps that ergonomically fit the ankle area of the boots are the best.
Toe strap– secures your boots to the bindings in the toe area for maximum response and board control. There are two types of toe straps; toe strap and toe cap. Toe straps are flat and put over the top of your toe area of the boots. Toe caps are usually wider with the underside caved in so that a large area of the tip of the boots are covered (anatomy image shows cap type).
Ratchets– fixed to the ankle and toe straps, they are used to secure the ladders to the straps. Strong ratchets are key as weak/broken ratchets cause some serious safety issues.
Ladder– straps with teeth that can be firmly secured in ratchets.
Gas pedal– the gas pedal at the front end of the binding is usually slightly raised than the rest of the binding baseplate for maximum energy transport to the board. Gas pedals can be pulled out or pushed in to fit your boot size and/or the waist width of the board.
I will explain how to tweak all these parts around to make your bindings fit you the best in the Snowboard Setup page.
Binding type
A lot of snowboard companies are constantly coming up with different types of bindings. The binding pictured above is a traditional type, with highback that can only move and fold down forwards. Flow and Flux bindings are ‘step-in’ rear-entry bindings, where you don’t need to undo the toe and ankle straps to get in, all you have to do is pull the highback down backwards and slide your foot in. This eliminates the problem of very very long time (insert sarcasm here) wasted on strapping in, and getting your butt wet in the process as most people find in easier to sit down while strapping in. The best aspects of step-ins are the fact that you can easily strap in while standing up in record time.
Binding size
Make sure you get the right size bindings for your boots. Binding size may differ from brand to brand but every binding company tells you which binding size goes with the general boot size – eg M bindings with 7-9 US boot size.
Most bindings these days come with gas pedals that allow you to shorten or extend the baseplate length in accordance with your boot size and your board width, so a little bit of size difference can be overlooked.
Highback
Highbacks come in VAST range of sizes and shapes, it would be hard to describe them all here. But the important point is that longer highbacks (of appropritate length) are more responsive than highbacks that come only halfway up the spine of your boots. With some brands (Switchback) you can get bindings without highbacks (no-back option) for jibbing, which gives you a more skate-y feel.
Most highbacks in this modern day are able to have its forward lean adjusted with a lever or screw. More forward lean provides higher response, meaning that you will be able to control the board better and faster when making the transition into the heel turn from toe-side carving. Too much forward lean is not recommended for beginners, as it will increase your chance of catching an edge while traversing on your toe-edge.
How to set up your bindings on your board
1. Firstly, decide on your stance width. Setting it up the same as your shoulder width is a good guide for beginners, it is recommended that jibbers set it up a little wider for improved board control.
2. Place the bindings on the snowboard at the insert hole sites with your stance angles set. (Everyone has different stance angles that are comfortable to them. It is a good idea to start with your front foot at -12, and back foot between 0 to 9. This makes your toes point outwards)
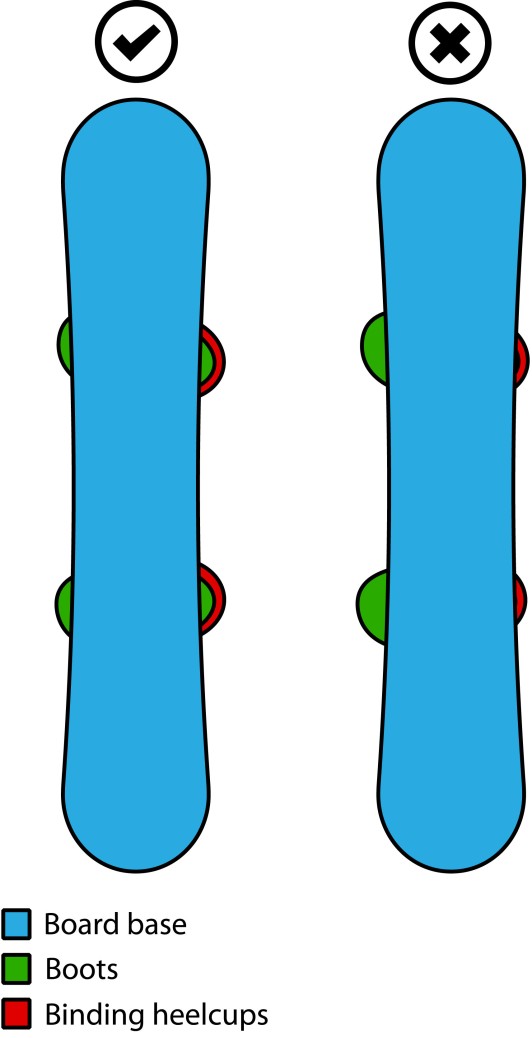
3. Make sure no parts of the baseplate stick out from the board. They should not be visible if you saw the base of the board with the bindings on. It is normal for heelcups to stick out. If any part of the baseplate stick out, move the bolts around into different holes on the disc and try again.
4. When your bindings are attached to the board, strap your boots in (not your feet, just the boots). When you view your board from the base side, the portion of your boots visible on either side should be equal.

5. Go shred!!


